

How To Export Photoshop Layers Into Illustrator
Thanks to the great similarities between how layers are handled in Photoshop and Illustrator, it's possible to move a layered document from Photoshop to Illustrator, or from Illustrator to Photoshop, and retain much of the layer structure that you've carefully created. During inter-product importing and exporting, Photoshop and Illustrator retain layers and their components, as well every bit type, masks, and other elements, every bit much as possible. Yet, layers will be merged if retaining them would compromise the appearance of the resulting file. This makes it possible to move artwork back and forth between the two applications, using each application for the kind of work information technology does best.
Layers from Photoshop to Illustrator
The all-time way to move a Photoshop paradigm into Illustrator is to utilise the Illustrator Place or Open up control.
-
To place a Photoshop prototype as a sublayer on the currently selected Illustrator layer, in Illustrator cull File > Place, and select the Photoshop image. Uncheck Link to embed the file (you lot cannot edit a linked file).
-
To create a new Illustrator file with each Photoshop layer converted to a new Illustrator layer, in Illustrator choose File > Open, and select the Photoshop epitome.
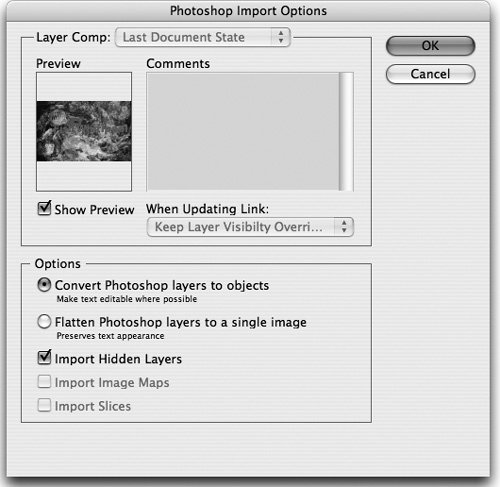
Whether you identify or open up a Photoshop epitome, in the Photoshop Import Options dialog box (Figure 12-17), select Convert Photoshop Layers To Objects and Import Hidden Layers, and click OK.
Figure 12-17. Placing a layered Photoshop image gives you the option to catechumen Photoshop layers to Illustrator objects.
If you lot opened a Photoshop image, a registration rectangle appears on the bottom layer around the image bounding box. (You can release information technology past choosing Object > Ingather Surface area > Release.)
Keeping Type and Layers Editable
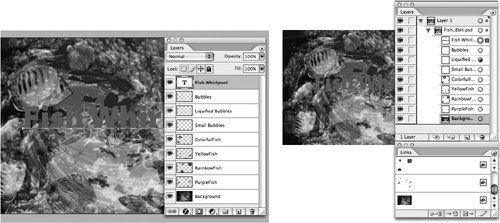
Placing a Photoshop file in Illustrator maintains the editability of type, and converts each Photoshop layer to a unmarried embedded epitome (as shown in the Links palette) when the Convert Photoshop Layers To Objects option is checked. Any Photoshop layer groups will be imported as Illustrator sublayers. Layer opacity and alloy mode settings will be retained when possible. Figure 12-18 shows a simple layered Photoshop file with type and prototype layers converted to Illustrator objects.
Figure 12-18. Photoshop image (left) contains prototype layers and a blazon layer. When converted to Illustrator objects, the blazon remains editable (right).
Merging Layers with Unsupported Features
Illustrator doesn't back up all Photoshop layer features. When Illustrator imports files with the following layer features, it merges the layers automatically, without alerting yous:
-
Adjustment layers.
-
Layers with certain blending modes (Color Contrivance, Color Burn down, Deviation, Linear Burn down, Linear Contrivance, Vivid Light, Linear Light, or Pivot Calorie-free.)
-
Layers that utilize layer furnishings (depending on specific details of the transparency and blending mode options chosen).
-
Layer sets that use the Dissolve blending manner.
Once merged, these layers are no longer editable.
Importing Type
Illustrator can import betoken type (single lines of blazon), text frame blazon, and type on a path. However, type that is warped with the Warp Text dialog box or the Warp transformation control must be rasterized during import. Likewise, type with any layer furnishings will be turned into pixels.
Tip: Reapply Effects in Illustrator
When y'all're bringing Photoshop type into Illustrator, remove whatsoever warp or layer furnishings in Photoshop. And so reapply the effects using commands in Illustrator.
Converting Masks
Photoshop mask features layer, vector, and clipping masks are converted to equivalent Illustrator masks.
-
Photoshop layer masks get Illustrator opacity masks (Effigy 12-xix). To meet the mask in Illustrator, expand the collapsed list of layers imported from Photoshop, target the layer with the opacity mask (indicated by a dashed line nether its proper noun), and and then employ the Transparency palette to view the opacity mask. The layer thumbnail and layer-mask thumbnails lucifer their Photoshop counterparts. (For more on opacity masks in Illustrator, run across Affiliate 11, "Transparency.")
Figure 12-19. A layer mask in a Photoshop epitome (left) is converted to an Illustrator opacity mask that can be viewed in the Transparency palette.

-
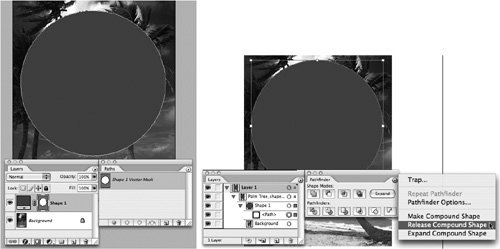
Vector masks and clipping masks created using vector shape layers go compound shapes in Illustrator (Figure 12-20). Utilise commands in the Pathfinder palette menu to release or aggrandize the selected chemical compound shape.
Figure 12-20. A vector shape layer in a Photoshop prototype (left) is converted to an Illustrator chemical compound shape that tin be edited in the Pathfinder palette (right).
-
Clipping masks created using a pixel layer (in which the purlieus of the non-transparent pixels defines the clipping mask) are rasterized when converted to an Illustrator object mask. (In contrast, clipping masks created using a vector shape layer, in which the vector outline defines the clipping mask, are retained along with the layers they mask.)
Layers from Illustrator to Photoshop
Only equally y'all tin can motion layered files from Photoshop to Illustrator, you can export layered Illustrator files to Photoshop to continue editing them. Before exporting to Photoshop, it'southward helpful to set your Illustrator layers to make them as editable as possible in Photoshop. Do this by creating sublayers and compound shapes.
Creating Sublayers and Chemical compound Shapes
Think ahead to which objects you want to maintain as vector in Photoshop. Motion those objects to carve up sublayers in Illustrator, and then convert them to chemical compound shapes.
We'll utilise as an case a simple Illustrator graphic that contains three kinds of blazon betoken, type on a path, and text frame. It besides contains some stars that we'd similar to move to Photoshop to utilise Photoshop layer furnishings (Figure 12-21, left).
Figure 12-21. Illustrator artwork with type and star shapes (left). To go along the stars every bit editable vector objects in Photoshop, motility them to sublayers and convert them to compound shapes (correct).
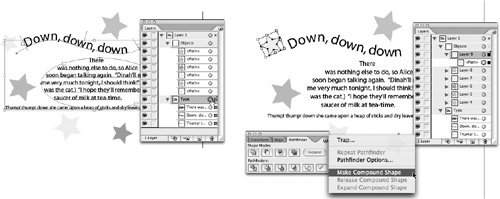
Nosotros moved each star to a separate sublayer. We then selected the path of each star on the Layers palette (Effigy 12-21, right) and created a chemical compound shape by choosing Make Compound Path from the Pathfinder palette card.
Preparing Compound Shapes
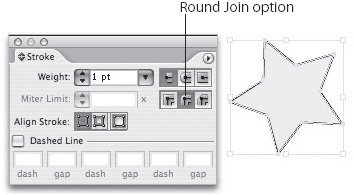
Earlier export, Illustrator shapes with strokes must be changed from the default Miter Bring together attribute to a Round Join in the Stroke palette (Effigy 12-22). If the stroke join isn't properly converted, the object will be rasterized rather than converted to a shape layer. When correctly converted, the stroke is applied as a stroke effect applied to the shape layer.
Effigy 12-22. Choosing a Circular Bring together before converting Illustrator shape with stroke.
Earlier exporting compound shapes, also eliminate any brushes, dashed strokes, or graphic styles applied to them, to preclude the objects from beingness rasterized.
Exporting as a Photoshop File
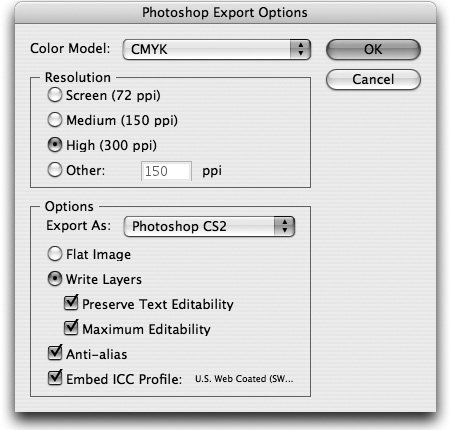
To consign an Illustrator file to Photoshop, choose File > Consign and select Photoshop (PSD) as the format. In the Photoshop Consign Options dialog box (Effigy 12-23), choose from the following options to retain quality and editability:
-
Color Model. Choose the same color model every bit the Illustrator file. Changing to a different color model will flatten the file when it'due south converted.
-
Resolution. For objects that will be rasterized when exported, select the Photoshop image resolution.
-
Export As. Select Photoshop CS2. Selecting the other choice, Photoshop 5.v, limits you to bespeak type and 100 layers.
-
Write Layers, Preserve Text Editability, Maximum Editability. Choose all of these options to include layers, sublayers, and blazon editability. Peak-level layers become Photoshop layer groups. Hidden layers get hidden Photoshop layers.
-
Anti-alias. Select this choice to smooth the edges of pixels, which is usually desirable.
-
Embed ICC Profile. Check this to create a color-managed certificate.
-
Click OK to create the Photoshop file.
Figure 12-23. Exporting Illustrator art with Write Layers and Preserve Text Editability options to allow editing in Photoshop.
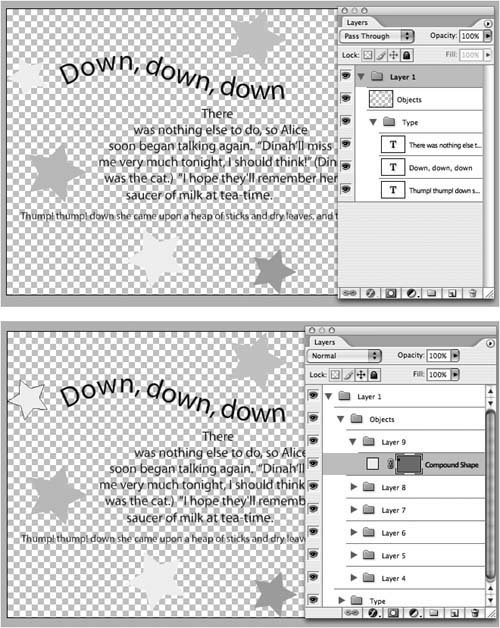
When the Illustrator file is exported with the Preserve Text Editability option selected, opening the file in Photoshop shows all the type on editable type layers (Figure 12-24, left). Bespeak type, expanse blazon, and blazon on a path are all converted successfully. The figure as well shows what happens if sublayers and compound shapes weren't created all the stars are rasterized onto a single pixel layer. Creating sublayers and compound shapes puts each star object on its own shape layer, with a vector mask then that information technology can still be edited in Photoshop as needed (Figure 12-24, right). Opacity and blending modes are too retained.
Effigy 12-24. Illustrator type converted to Photoshop type layers (top). Putting vector objects on sublayers and making them compound shapes in Illustrator retains their editability in Photoshop (bottom).
Illustrator masks convert to Photoshop masks: Both "traditional" clipping masks and layer-based masks are turned into Photoshop shape layers.
Source: https://flylib.com/books/en/2.134.1.97/1/
Posted by: bradleyletwo1998.blogspot.com
0 Response to "How To Export Photoshop Layers Into Illustrator"
Post a Comment